


Weaning and baby food
It’s been a while!! How time flies when you’re having fun!!
Since doing the pop-up at the cheese kitchen bistro I briefly became the chef there Fridays and Saturdays (until the owners made the job full time which I had no time for) It was a hectic 3 months that seriously boosted my self esteem as a chef, and even the only night where it all went horribly wrong, I learned much!
I have since given up my engineering job to look after my twins (now 14months old), But for all the want to write about weening the girls, I’ve not known how to break the ice on the subject.
I would hate for example to alienate those who feed/have fed their offspring with store-brought products, but I certainly can’t refrain from expressing my abhorrence toward what is in effect “fast food for babies” a recent study shows that these store brought baby foods are half as nutritious than home made, often loaded with sugars, and seem to me to be more geared up towards “guiding” babies toward sugary foods in the future than anything else.
I hope to inspire some new parents to make fresh healthy and nutritious foods from scratch for their infants, but ultimately everybody is different and although I’ve had superb results with my daughters my recipes may not suit everybody.
One thing I would urge everybody to AVOID is using microwave ovens in ANY step of preparing food or drinks for babies or children. Both as a cook and as an engineer I could ramble on about why but ultimately I believe that gentler forms of cooking are best at least for taste if nothing else.
The basic principal is to introduce the babies to as much seasonal fresh foods as possible without taking into account OUR own likes/dislikes or our food habits, and avoiding as much as humanly possible any processed foods. I feel it is important to introduce babies to all the taste sensations from the onset (saltiness excluded), omitting all artificial forms of sweetness (except those contained in formula milk), but still following NHS guidelines on what foods to use/avoid, and always having a breakfast of porridge at the start of the day (initially prepared with the formula milk and baby porridge, until whole milk and milled oats became suitable) as a safety net in case they might refuse to eat during the day.
I object to playing birdie, aeroplane, train or any other nonsense… If the baby doesn’t want the food there will be a reason: it’s either poor quality (I notice this happens with vegetables that are not at their best or poorly cooked/over-cooked) or they are not hungry (could be due to drinking too much bottle milk, or loss of appetite due to teething) or they are simply testing you to see if they’ll be fussed over… Either way my rule is if you don’t eat now you’ll eat next time! But remember to taste the food! It will seem bland if your normal diet is high in salt but it should generally taste fine.
Also please note that if the baby spits out a new type of food as one of mine did the first time I gave her mushrooms, it’s not to say they don’t like it, as long as they had it on the tongue a couple times before rejecting it it’s fine, remember to taste it and try again another day, you might be surprised! In my case with the mushrooms, they do have a unique texture so I chopped it much finer the next day and it went down a treat!
Keeping leftovers or using ready prepared vegetables is not advisable during weening due to oxidisation of the foods and loss of nutrients through “bleeding”. Whole fresh and where possible organic is best, lightly steamed (no need to over-cook things that are to be puréed anyway) cooled in fresh water, puréed with milk (EBM or formula) and a touch of baby rice, later on when teething starts introduce mashed or chopped components to the purée, when it’s time to begin introducing meat and other “proteins” I’ve tried to limit these to 2 times a week at the evening meal to begin with. As you begin increasing the size of the bits the babies start learning to chew, you can then begin trying finger foods (don’t worry if they gag a bit at first).
They say that your babies should eat what you do… I strongly disagree of sorts!! It is a great opportunity for YOU the adult to eat what your baby is eating, MAKING YOUR DIET HEALTHIER!
 Here is an example of a meal made with a rich diversity of tastes and textures, sweetness of carrot, vibrant raw double podded new season broad beans just warmed through, slightly bitter yet sweet barely wilted lettuce, juicy green beans, carbohydrate rich small pasta, starting with some whole steamed beans and carrots as finger foods, spoon feeding the rest mashed with a fork, mixed with chopped broad beans and shredded lettuce, both gently warmed with a tiny amount of unsalted butter until lettuce is wilted slightly, and mixed with slightly over cooked pasta (no salt in the water)
 |
 |
 |
Please feel free to post any questions/requests in the comments below and I will answer as soon as I can.
Recipe for babies of all ages
This is really easy to make, really delicious, and the little ones loved it!
Ingredients:
1 really fresh trout, gutted, washed and patted dry (eyes clear & shiny not sunken & cloudy, it shouldn’t smell “fishy”)
Fresh whitecap or portobello mushrooms (fresh mushrooms feel firm and quite heavy)
1/2 Courgette or a whole one if they are small (when just picked a courgette will make a cracking sound when you slice it, it then becomes less firm until it’s spongy, I’ll settle for a courgette that’s nice and firm, this will instantly produce tiny droplets on the flesh “bleed” when you slice it)
1 onion, 2 cloves of garlic, oil (I used grape seed oil this time), butter, cream, lemon, farfalle pasta, salt & pepper.
You will need a good non stick pan large enough for your whole fish (oven proof if possible), a couple of offset spatulas suitable for the non stick pan (you don’t want to scratch it with metal utensils) and a deep pot for the pasta, I inaugurated my new ceramic coated pan for this and I thought it was very good for the price.
Fill a deep pot with water (1-2 inches from the top) cover and put it on to boil, and preheat the oven to 120*C
 To begin with finely chop your onion and begin to sweat it on low heat with a little oil, you will benefit a lot if your knife is really sharp as less juice will vaporise and make your eyes water, a properly sharpened knife will make hardly any noise when slicing through the veg, clean your mushroom removing the stem (unless they are so fresh that the stem is completely pure white in colour when sliced lengthwise I wouldn’t use the stem even on closed cup mushrooms) and dice, before adding the mushrooms crank the heat up under your pan and let it get really hot keeping the onion moving so it doesn’t burn or they will just lose their water content and boil instead of frying, quarter the courgette lengthwise and slice it about 1-2mm thick, add to the pan and sautée it (or stir it) briefly so it is lightly cooked before setting aside.
(Note in the photo how my pan is not “crowded”, if you put too much in the pan it will not be able to keep it’s heat and things will not cook properly)
Measure out 200-250g of your farfalle pasta (dry butterfly pasta) and plunge in the boiling water without putting the lid back on, stir every so often so it doesn’t stick to the bottom, I’ll overcook it a bit on purpose so it is more digestible for the babies but still decent food for the adults. Drain and set aside.

| In the meantime back in the same pan, on a medium-high heat place your whole trout with a little oil, and fry for a few minutes until lightly browned, carefully turn it over using the spatulas, fry for a minute and add some chilled butter before transferring to the preheated oven to rest for 8-10 minutes while the pasta cooks. |
Your fish should be just done and not overcooked use a knife and fork to trace the seam running down the spine (you can see the line running down the side of the fish but if in doubt lift a little of the skin to find it if you’re not familiar with this fish) and gently push the top and bottom fillets on the same side of the fish (by top and bottom I mean the sections above and below the line clearly visible in the photo above) apart bit by bit all the way down from head to tail, they should come off the bone easily enough but still have the sheen and light translucency that perfectly cooked fish has, now lift the tail a little and with the knife cut the skin close to the tail so the fillets are released, the whole skeleton should come away in one piece.

|  |
As I prepared this meal for my 14month old daughters to eat with me I spent time making sure all bones were removed, the bottom fillet (where the chest cavity was) is the easiest to clean, you can clearly see the lines where the bones are or were, and also running your fingers along what was the center of the fish from tail end up to the head you will feel any rib bones that you might have missed, DON’T FORGET the fin bones, one near the head and one near the center of the belly fillets on the skin side (not visible in photos). As far as the top fillet goes there are bones in the half closest to the head that you can’t see or feel with your fingers or indeed when you eat the fish… BUT just to be safe save it for the adults and not the kids, the half from the tail is boneless but make sure the dorsal fin bones are all removed.
PLEASE NOTE THAT SO FAR NO SALT HAS BEEN USED ANYWHERE AND THE SKIN HAS NOT BEEN REMOVED there’s lots of nutrients under the skin and it’s delicious to eat.
Back in the pan add the boneless fish to the vegetables and the pasta that has by now cooked and drained, add a splash of cream an heat through stirring or sautéing to coat all the pasta and thicken slightly but not too much it will thicken more as it cools and you don’t want it to become dry, add a squeeze of lemon juice to taste, a good grind of black pepper, and a TINY pinch of salt…

|
 |
Serve the babies/kids portions first so they have time to cool down, to the grownup’s portions add the rest of the fish and season to taste, remember that if you’re trying to make your diet healthier you may as well not add too much salt.

They say an image is worth a thousand words… I hope you try this recipe and let your kids and yourself enjoy some good fish!! Bon appetite!
Easter time
I like easter, but unlike some people chocolate eggs and religious connotations are far from my head at the thought. When I think easter the first thing in my mind is Asparagus!
I was raised in central Italy, where twice a year the whole country goes on a picnic: once on the 15th august and the other on Easter Monday.
As a boy my first line of business on easter monday out in the italian countryside would be foraging for wild asparagus, of course I wasn’t successful every year! But the taste of the hard earned freshly picked wild spears was always reward enough for the effort, no matter how small a bunch I might have won.
When buying Asparagus I recommend you buy them with the least amount of miles possible, and as fresh as possible.
Asparagus omelette:
Use the back of a knife to trim each precious spear, starting from the bottom end pressing gently, gradually working your way up the spear until the knife finally cuts through… Once prepared and washed, finely chop the spears reserving 1 inch of all the tips.
In a non stick frying pan soften some finely chopped onion or chalottes, once translucent add the chopped asparagus and fry gently for a minute, add beaten eggs (try to source your eggs from a local producer if possible) and the asparagus tips, stir until everything is more or less distributed equally season and cook omelette to taste.
Happy easter
Popup at “The Cheese Kitchen Bistro”
Join me on Friday 22nd & Saturday 23rd February at:
The Cheese Kitchen Bistro“108 Castle Rd, Bedford”
where I will be cooking a special tasting menu:
Chicken “Beer”
*
King Scallop with Champagne Sauce
*
Steak Tartare (Bruxelles Style)
*
Roast Rack of Lamb
Potato “Risotto” with a Rich Jus
and home made Lemon Mint Sauce
*
A moist Rasberry Sponge
& White Chocolate Basil Ganache
or
Cheese Board
a selection from our cheese room
or if you prefer the exclusive Vegetarian Option composed by:
Red Vine Tomato Consomme
*
Roast “scallop” of Leek in Champagne Sauce
*
Fig Tart Wodehill blue cheese
With Rosemary Honey
*
Fresh Home Made Tofu
wrapped in “Edible Aubergine Leather”
Madeira & Orange Sauce
*
A moist Rasberry Sponge
& White Chocolate Basil Ganache
or
Vegetarian Cheese Board
a selection from our cheese room
What are you waiting for?
Book your table now by calling 01234 217325
Or Email thecheesekitchen@gmail.com And…
Bon Appetit! 🙂

Warming up (serves 2)
200ml cream (or condensed milk)
6-8 tsp Cacao 100%
sugar to taste
400ml milk
In a pan pour the cream and whisk in the cacao, heat gently without boiling, when you see it darken add milk and sweeten to taste, bring heat back up (without boiling) running the whisk or a satula against the bottom of the pan to stop it catching. Pour in a couple of measures of your spirit of choice (I used amaretto di saronno) pour out into mugs, and enjoy the warmth!
P.S. if you find it too harsh you can leave it on the heat a bit longer to cook out some (or all) of the alcohol
A treat for the weekend
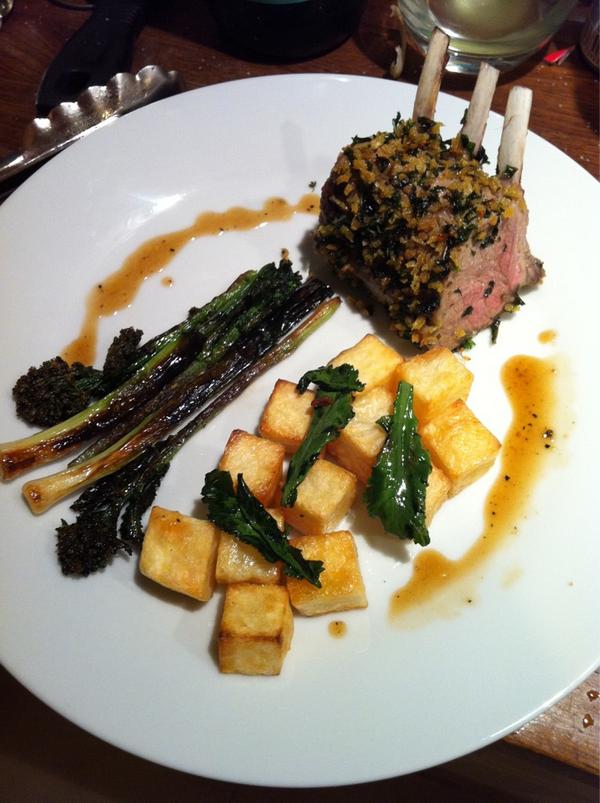 It’s almost the weekend finally, and for many it’s time to think of a nice roast dinner YUM!
You might think that I’ll be missing out as I’m #LoosingWeight! but you’d be wrong!
INGREDIENTS
- Rack of lamb with chine bone removed
- Potato
- baby leeks
- sprouting broccoli
- fresh thyme
- fresh mint
- panko breadcrumbs
- lemon
- stock (preferably lamb)
Carefully remove the fat from your lamb rack (you can have your butcher do this for you but make sure you keep the fat) so you’re left with a “French trimmed rack”, score the fat on the skin side and place skin side down in a oven-proof frying pan on medium-low heat to start rendering, You’ll be using the fat to sear the now lean meat, this way we’re going to get maximum flavour without adding extra fat.
Whilst the lamb fat is rendering preheat the oven at 200C, peel and cube your potato, place in a pan of cold salted water (when using salted water to cook or blanch, taste it to make sure it’s not over/under salty) place on medium heat and bring to the boil, once the cubes start to take on a translucency, test with a skewer, the potato should offer slight resistance, take them out of the water (reserve this for the other veg) and place on an absorbent paper lined tray in the freezer for a few minutes, remove paper and dress with a little oil and salt, place in the oven to roast.
Season the meat with salt and pepper, remove the skin/fat from the pan and set aside, bring the heat up and sear the lamb rack in the hot pan, once brown on all sides place bone side down, top with sprigs of thyme and put the fat back on top, roast in the oven for 10min then rest for 10 more covering with foil to keep warm (this ought to give a lovely blushing finish to the meat)
Blanch some sprouting broccoli (preferably with the stalks peeled) & baby leaks in the boiling salt water for a few minutes, drain on kitchen paper, then fry in a hot pan with some oil (this will spit so be careful) until almost burned, turn and do the other side.
Blanch some fresh mint for a few seconds, dry and finely chop, mix with breadcrumbs (I use panko) season and toast them in a pan.
In the rinsed hot pan pour some lemon juice and caramelise, as it begins to brown pour in some stock (preferably lamb) to stop it from burning, reduce to a jus, taste and adjust acidity with honey or more lemon if needed (keep it slightly on the sharp side)
To assemble: slice the rack into a 3 bone portion, brush with the jus and roll in the crumb, plate up with the roast potato cubes and burned baby leak & broccoli sprouts, and drizzle some more jus around the plate.
Bon appetit
Courgette fettuccine & home smoked salmon
This is one of my new recipes I’ve been most pleased with, and it’s really easy to do!
INGREDIENTS
salmon fillet
Fresh courgette
Vegetable stock
Capers
Lemon
Wood for smoking “Sawdust”
Place your salmon fillet in a hot smoker with 1tsp of your wood of choice, for this I use oak (if you don’t have one you can use a steamer, find out how to do it without ruining the steamer) Smoke on a medium-low heat, after 20min your salmon should easily flake, if not cook a little longer.
Chop 1tsp of capers, when you think they are finely chopped, chop them as much again, gather in a ball, place on kitchen towel, and squeeze out remaining moisture.
With a mandolin or a potato peeler slice the courgette into ribbons, heat 500ml of veg stock, lightly poach the courgette in the hot stock, it needs to keep some texture, and will barely acquire some translucency.
In a hot pan squeeze some lemon juice and caramelize, make sure it doesn’t burn, pour the veg stock in a bit at the time to make a jus.
Arrange the courgette fettuccine in a bowl or plate, flake your salmon on top, sprinkle with caper dust, drizzle with the lemon jus
Bon appetit
Smoked fish crostini with green mango chutney
This is something that can either be made from scratch or just thrown together, I made it first time last week when my wife was in hospital waiting to give birth, and I was running to-and-from and had no time/will to cook! I also found it good as a “just for one person” kind of meal and not only is best made in advance but it actually improves if kept in the fridge over night.
Ingredients:
- 1 green mango (readily available in most supermarkets)
- 1 onion
- 1 bunch of mint
- 1 green chilly
- salt & pepper
- sugar
Peal the mango with a potato peeler, slice it off along the flat side close to the kernel, and chuck in a food processor, depending how strong and large your onion is, once pealed I’d start by adding just less than a quarter, you can always add some more but you can’t take any out… add the washed mint leaves from 2-3 sprigs, and add some of your green chilly (again proceed in steps) rest in the fridge if you have the patience…
Blitz the above in the food processor and then taste, you need to take into account that the flavour will develop when you keep in the fridge, don’t worry if the onion is a bit too strong as you are making it, it will lose it’s pungency.
Season to taste with some black pepper, a generous pinch of salt and sugar (the salt will enhance the mango flavour, you’ll probably find you’ll need more than you’d expect)
The chutney (I’m told) is a traditional Punjabi accompaniment to the lentil dish of Dahl, however I find it irresistible with some hot smoked mackerel or salmon and a slice of toasted ciabatta.
Low carb alternative:
Serve flakes of hot-smoked mackerel on slices of slow roasted beetroot (2hrs @ 150°C skin on, peal after cooling) top with some chutney and serve with a side salad.
NOTE: there’s nothing stopping you making your own hot smoked fish, in-fact if you are a food lover I’d encourage you to buy a stove-top smoker and play with different types of fish and wood-chip, nothing beats it!! and there’s no reason why you shouldn’t (if you don’t already do so) bake your own bread to use in this recipe to make it that bit more special.
The Borscht experiment

The Borscht experiment
The subject came up on Twitter one evening, and as I’d been slow roasting beetroot of late it tickled my curiosity, and so I searched! it soon became apparent that there’s a fair amount of debate on the origins and the “proper recipe” and so I soon got bored and went into the kitchen:
INGREDIENTS:
- mirepoix
- slow roasted beetroot
- fresh beetroot
- stock of choice
- salt & pepper
- natural yoghurt
- tamarind paste
as I’m on my own version of a diet I sweated the mirepoix without oil in the pan, added some beef stock, juiced the raw beetroot and added to the mix, brought to the boil and cooked till the earthytaste of the raw beetroot disappeared, added chopped slow roasted beetroot, served with some natural yoghurt that was mixed with a bit of tamarind paste to add some acidity and that’s it.
It really was that simple! and even though I’ve never had the real deal, I found this broth rather tasty and intriguingly different.
it really was that simple! and I hope you’ll try it and tell me what you think of it
Happy experimenting!!
Tomato in all it’s glory

pure tomato flavour!
For some unknown reason I’ve been bugged by tomato-y thoughts for the past couple of days! like a song that won’t leave your head, I’m sure you can imagine, it gets a bit much. so here’s how I got it out of my head and into my belly!
There really is no excuse not to make this (unless of course you hate tomato) even if you have never cooked in your life, all you need is a few ingredients! the recipe is so simple that anybody can make it. Even though I used tomatoes from my local supermarket I’d encourage you to go out and look for the best quality tomatoes you can find.
the rest is really simple and here’s what to do:
INGREDIENTS:
- I chose a beef tomato for it’s meatiness, and some sweet cherry tomatoes
- extra virgin olive oil (I prefer Italian oil as it lacks the harshness that Spanish ones sometimes have)
- Oregano
- Garlic
- Salt
Cut a cross at the base of the beef tomato just enough to pierce the skin, bring a pot of water to a rolling boil, plunge the beef tomato in the boiling water for 3-5 seconds then refresh in cold water, carefully peel the skin off, cut a thick slice, season and set aside in a container that’s not too big.
Very carefully warm to 40*C enough extra virgin olive oil to cover the slice of tomato, put a teaspoon of oregano in the oil and let infuse for a few minutes, pour over the slice of tomato and leave to marinate for 10-20 minutes (or longer) at room temperature turning the slice half way through to make sure both sides are marinated properly.
In a food processor blitz the cherry tomatoes and pour into a very fine sieve (leave overnight to pass through a muslin cloth to obtain a clear tomato water if you wish, I prefer to have a coloured juice) leaving it to drip in the container below, slice a clove of garlic and put it into the tomato water to infuse for a few minutes.
Place the marinated slice of beef tomato in your serving bowl, pour the tomato water through a strainer around the outside of the slice, dress the slice of beef tomato with a little of the infusing oil, and serve.
Bon appetit!
I'm an engineer that loves to cook and can't help but wear my heart on my sleeve, father of a beautyful set of twins
